Introduction
bevy_ecs_tiled is a Bevy plugin for working with 2D tilemaps created using the Tiled map editor.
It leverages the official Tiled Rust bindings for parsing and loading Tiled map files, and uses the bevy_ecs_tilemap crate for efficient rendering.
This plugin aims to provide a simple and ergonomic workflow for integrating Tiled into your Bevy 2D games, letting you focus on game design while handling the technical details of map loading, rendering, and entity management.
Features
- Comprehensive Map Support:
Load orthogonal, isometric, or hexagonal maps, with finite or infinite layers, using either external or embedded tilesets, atlases, or multiple images. - Rich Tiled Feature Integration:
Supports animated tiles, image layers, tile objects, and Tiled worlds for multi-map projects. - Entity-Based Architecture:
Every Tiled item (layer, tile, object, etc.) is represented as a Bevy entity, organized in a clear hierarchy: layers are children of the map entity, tiles and objects are children of their respective layers.VisibilityandTransformare automatically propagated. - Flexible Map Lifecycle:
Control how maps are spawned and despawned. Use Bevy events and observers to customize scene setup or react when a map is loaded and ready. - Automatic Physics Integration:
Automatically spawn Rapier or Avian physics colliders for tiles and objects, with support for custom backends. - Custom Properties as Components:
Use Tiled custom properties to automatically insert your own components on objects, tiles, or layers, enabling powerful data-driven workflows. - Hot-Reloading:
Edit your maps in Tiled and see updates reflected live in your Bevy game, without recompiling or restarting.
Disclaimer:
Both this book and the whole crate have been heavily inspired by the bevy_ecs_ldtk crate, which is essentially the equivalent of bevy_ecs_tiled but for the LDTK map editor.
A big thank you to the authors and contributors of bevy_ecs_ldtk for their inspiration and ideas!
Purpose of this Book
This book is designed to help you understand how bevy_ecs_tiled works, what you can achieve with it, and how to use it effectively in your projects.
You’ll find:
- High-level concepts and design explanations
- Step-by-step tutorials and practical guides
- Migration guides for upgrading between versions
- Miscellaneous tips and advanced topics
If you need detailed API documentation, please refer to the bevy_ecs_tiled API reference.
The examples directory is also a great place to see the plugin in action.
Note:
This book assumes you already have some familiarity with Bevy and the Tiled map editor.
If you’re new to these tools, check out their official documentation and the useful links section for recommended resources.
Book Structure
This book is organized into several sections:
- Design & Explanation:
Learn how the plugin works internally and the reasoning behind key technical choices. - How-To Guides:
In-depth tutorials covering specific features and workflows. - Migration Guides:
Step-by-step instructions for upgrading between major versions. - Miscellaneous:
Additional topics and tips that don’t fit elsewhere.
Happy reading, and enjoy building your games with Bevy and Tiled!
FAQ
What’s the current status of the crate?
The crate is already quite usable, but it is still under active development.
You may encounter bugs, missing features, or breaking changes as the API evolves. However, the project follows semantic versioning and provides a migration guide for each breaking change (for example, when a new Bevy release is supported).
I try to list all known limitations and bugs of the crate as Github issues.
What kind of maps are supported?
Nearly all map types from Tiled are supported:
- Orthogonal
- "Flat-top" hexagonal
- "Pointy-top" hexagonal
- "Diamond" isometric
Not supported: Isometric "staggered" maps (see issue #31).
While we support isometric maps, we currently do not support isometric tilesets. But you can still use an isometric map with an orthogonal tileset.
I want a huge map for my game, is it a problem?
If you have performance issues with a single large map, consider using a Tiled world. A Tiled world is a collection of multiple maps, and you can control which ones are loaded at any given time.
To spawn a Tiled world, use the TiledWorld component after loading a .world asset:
#![allow(unused)]
fn main() {
use bevy::prelude::*;
use bevy_ecs_tiled::prelude::*;

fn startup(
    mut commands: Commands,
    asset_server: Res<AssetServer>,
) {
    // Spawn a new entity with the TiledWorld component
    commands.spawn(
        TiledWorld(asset_server.load("demo.world"))
    );
}
}
You can customize world loading with the same components and events / observers as for maps, and use the TiledWorldChunking component to control map chunking.
I’m using an isometric map and it seems all messed up!
- Make sure you are actually using a "diamond" isometric map, not a "staggered" one (which is not supported).
- For isometric maps, you may need to tweak the
TilemapRenderSettingscomponent frombevy_ecs_tilemapto enable Y-sorting and adjust the chunk size. - Make sure you are using an orthogonal tileset and not an isometric one.
See the isometric maps example for more information.
How do I add physics to my game?
You can automatically spawn physics colliders on tiles or objects using either the Avian or Rapier physics backends.
All you need to do is add the appropriate plugin to your app—bevy_ecs_tiled handles the rest.
You can control which objects or tiles receive colliders based on their name and by using Tiled’s built-in collision editor. See the dedicated physics guide for details.
How can I update my Bevy entities directly from Tiled?
Suppose you’re building a top-down RPG and want to assign properties (like movement cost or walkability) to each tile.
You can declare in your code some struct or enum to describe these properties then use Tiled custom properties editor to attach these properties to Tiled elements.
The crate will automatically insert the corresponding Bevy Component on the Tiled entity when you load the map, making it available for your game logic.
See the custom properties guide for more information.
How do I enable map hot-reload?
Enable the Bevy file_watcher feature in your project.
With this enabled, bevy_ecs_tiled will automatically reload a map or world whenever it is updated in Tiled.
How do I access Tiled "raw" data?
Sometimes you may need to access the underlying Tiled data, such as a tiled::ObjectData or tiled::TileData.
You have several options:
- Use provided ECS components such as
TiledLayerIdand associated helper methods. - Listen to map loading events and use
TiledEvent<E>helper methods to access Tiled data. - Retrieve the
TiledMapStoragecomponent from your map entity to get the mapping between Bevy entities and their corresponding Tiled data.
These options are demonstrated in examples and debug plugins.
I found a bug! / Feature 'X' is missing! / How do I do 'Y'?
This crate is still a work in progress, so you may encounter bugs, missing features, or have questions about usage.
- Check the open issues to see if your problem is already reported.
- If not, please open a new issue! I try to address every issue as quickly as possible.
Contributions are very welcome! If you’d like to contribute, please read the contribution guide and feel free to open a PR!
Why use Tiled?
Tiled may feel a bit outdated in terms of "look and feel," especially compared to more modern map editors like LDTK.
However, Tiled offers a wealth of features that make it a compelling choice for many projects.
If we compare Tiled with LDTK, both editors provide powerful capabilities such as:
- Auto-tiling
- Adding gameplay information to map tiles and objects (custom properties)
- Support for world layouts (multi-map projects)
But Tiled also offers several unique advantages:
- Native support for both isometric and hexagonal maps (including "pointy-top" and "flat-top" hexes)
- Built-in support for animated tiles
For my own needs—specifically, working with hexagonal maps—Tiled was the obvious choice!
However, if you only need orthogonal maps, you might want to try LDTK, especially in combination with the bevy_ecs_ldtk crate.
Of course, Tiled remains a robust and versatile option for a wide range of 2D games.
Entities Hierarchy and Marker Components
When a map is loaded, it spawns many entities: for the map, for layers, for tiles, for objects, for colliders, and more.
To keep things organized, these entities are structured in a parent/child hierarchy, and every entity has an associated marker component to help with queries and system targeting.
Using a hierarchy also enables inheritance of certain components from top-level entities down the tree.
For example, if you change the Visibility of a layer entity, it will automatically apply to all entities below it in the hierarchy, such as tiles or objects.
Hierarchy Overview
World
When loading a .world asset, you get a TiledWorld entity at the top of the tree, which holds a handle to the TiledWorldAsset corresponding to your .world asset, along with all settings that apply to it.
Map
When loading a .tmx asset, you get a TiledMap entity at the top of the tree, which holds a handle to the TiledMapAsset corresponding to your .tmx asset, plus all map-level settings.
If working with a Tiled world, you will have several maps, each as a child of the top-level world entity.
Note that all map-level settings can also be added to the TiledWorld entity as they will be propagated down to the underlying maps.
Layers
Below the map, you have the layers.
Layer entities are identified by the generic TiledLayer component whose value can help distinguish between layer types.
Objects
Objects are direct children of their parent TiledLayer::Object.
They are identified by the TiledObject marker.
Note that in case of a TiledObject::Tile, the object entity will have another child entity with a TiledObjectVisualOf marker component, holding the actual visual of the object: a Sprite and eventually a TiledAnimation.
Tiles
Tiles have a slightly more complex structure:
- Below each
TiledLayer::Tiles, there is oneTiledTilemapper tileset used in the map. It notably holds theTilemapBundlefrombevy_ecs_tilemap. - Below these tilemaps, you find the actual
TiledTileentities, each corresponding to a tile in the layer for a given tileset.
Physics Colliders
At the bottom of the hierarchy, you find physics colliders.
They are spawned as children of their "source" (either a TiledLayer::Tiles or a TiledObject) and can be identified using the TiledColliderOrigin marker component.
Entities responsible for spawning a physics collider will have a TiledColliders component containing a list of attached colliders.
Transform and Visibility Propagation
Bevy automatically propagates Transform and Visibility components down the entity hierarchy.
In practice:
If you change one of these components for a top-level entity (e.g., a layer), it will propagate down and apply to all child entities. For example:
- Adding
Visibility::Hiddento an object layer will hide all objects in that layer. - Moving an object layer will also move all objects it contains.
Special case for tiles:
Tiles are not rendered as individual entities, but as part of a "chunk" of several tiles for performance reasons.
Each individual tile entity does not have its own Transform or Visibility component.
Instead, these components are propagated down to the TiledTilemap, and bevy_ecs_tilemap handles updating the corresponding tile chunks.
Important:
Even though you technically could, you should not addTransformorVisibilitycomponents to individual tile entities:
- It will not have the intended effect—everything is handled at the tilemap level.
- It may hurt performance significantly.
Z-ordering
In 2D games, the Z-axis determines the rendering order: elements with a higher Z value appear in front of those with a lower Z value.
For a deeper dive into Bevy's coordinate system and Z-ordering, see the Bevy cheatbook.
Layer Ordering in Tiled and Bevy
When designing your map in Tiled, you expect that layers higher in the stack visually cover those below.
This is especially important for isometric maps, which often use multiple tile layers for proper visual stacking.
To reproduce this behavior in Bevy, bevy_ecs_tiled assigns an incremental Z offset to each layer in the hierarchy.
If we call this offset OFFSET:
- The topmost layer (in Tiled) will have a Z transform of
0 - The next layer down will have a Z transform of
-1 × OFFSET - The next one:
-2 × OFFSET - And so on...
By default, OFFSET is set to +100.
You can adjust this value by adding or modifying the TiledMapLayerZOffset component on your map entity.
Tip:
bevy_ecs_tilemapalso applies a small Z offset to each chunk for correct rendering.
If your layer offset is too small, you may see unexpected rendering order issues.
A larger offset (like the default100) helps avoid this.
Objects on a Layer
Objects on a given layer inherit the Z offset of their parent layer, but each object is given a small additional offset to avoid "Z-fighting"—a flickering effect that occurs when two objects share the same Z value.
- Each object receives a unique, small Z offset relative to its parent layer.
- This ensures that overlapping objects are rendered in a stable order.
If you need precise control over the Z position of specific objects (for example, to implement custom sorting or to ensure a particular object always appears on top), you can:
- Listen to map events and manually adjust the Z offset of your objects after they are spawned.
- Use your own logic to set the Z value based on object properties or gameplay needs.
Map Loading Events
When loading a map or a world with bevy_ecs_tiled, you receive events that both notify you about the loading progress and allow you to customize how your map or world is handled in your game.
These events are extremely useful for:
- Running custom logic when a map, layer, object, or tile is loaded
- Accessing or modifying entities as soon as they are available
- Integrating with other systems (e.g., spawning a player, setting up triggers, etc.)
TiledEvent<E>
All bevy_ecs_tiled events are encapsulated in the TiledEvent<E> structure.
This provides more context for each event, including the origin of each particular event E and helper methods to access Tiled data.
For example, an event related to an object will contain not only information to identify the object itself, but also the layer and the map containing it.
#![allow(unused)]
fn main() {
use bevy::prelude::*;
use bevy_ecs_tiled::prelude::*;

fn handle_event(
    mut object_events: MessageReader<TiledEvent<ObjectCreated>>,
) {
    // Even though we receive an event for a Tiled object,
    // we can retrieve information about the Tiled map
    for e in object_events.read() {
        let object_entity = e.origin;
        if let Some(map_asset) = e.get_map_asset() {
            info!("Received TiledEvent<ObjectCreated> for: '{:?}'", map_asset);
        }
    }
}
}
List of Map and World Events
There are six main events:
- For maps and worlds:
TiledEvent<MapCreated>:
Emitted once a map has finished loading. Contains information about the map entity.
(If loading a world, this is called after the world event.)TiledEvent<LayerCreated>:
Emitted for each layer after the map is loaded. Contains information about the layer entity.TiledEvent<TilemapCreated>:
Emitted for each tilemap, for every tile layer, after the map is loaded. Contains information about the tilemap entity.TiledEvent<TileCreated>:
Emitted for each tile after the map is loaded. Contains information about the tile entity. Note this event is only fired for tiles using custom properties.TiledEvent<ObjectCreated>:
Emitted for each object after the map is loaded. Contains information about the object entity.
- For worlds only:
TiledEvent<WorldCreated>:
Emitted once the world has finished loading. Contains information about the world entity.
All these events are sent after the map or world is fully loaded and all components (including those from user properties) have been inserted.
How to Use Map Events
You can listen to these events in two ways:
1. Using Buffered Events
#![allow(unused)]
fn main() {
use bevy::prelude::*;
use bevy_ecs_tiled::prelude::*;

fn handle_map_event(
    mut map_events: MessageReader<TiledEvent<MapCreated>>,
    map_query: Query<&Name, With<TiledMap>>,
) {
    for e in map_events.read() {
        if let Some(map_entity) = e.get_map_entity() {
            if let Ok(name) = map_query.get(map_entity) {
                info!("=> Received TiledMapCreated event for map '{}'", name);
            }
        }
    }
}
}
2. Using Observers
Observers can be attached directly to map or world entities.
This is useful for "inline" logic, such as spawning a player when a map is ready:
#![allow(unused)]
fn main() {
use bevy::prelude::*;
use bevy_ecs_tiled::prelude::*;

fn startup(mut commands: Commands, asset_server: Res<AssetServer>) {
    commands
        // Spawn a map and attach an observer on it.
        .spawn(TiledMap(
            asset_server.load("maps/orthogonal/finite.tmx"),
        ))
        // Add an "in-line" observer to detect when the map has finished loading
        .observe(|_: On<TiledEvent<MapCreated>>, map_query: Query<&Name, With<TiledMap>>| {
            if let Some(map_entity) = e.get_map_entity() {
                if let Ok(name) = map_query.get(map_entity) {
                    info!("=> Observer TiledMapCreated was triggered for map '{}'", name);
                }
            }
        });
}
}
When Are Events Sent?
All these events are sent after the map or world is actually loaded and their components have been inserted, including those coming from user properties.
This means you can safely query for components and child entities in your event handlers.
Dedicated Example
A dedicated example is available to demonstrate how to use these events in practice.
Getting started
Add the required dependencies to your Cargo.toml file:
[dependencies]
bevy = "0.18"
bevy_ecs_tiled = "0.11"
Basic Usage
To get started, add the plugin to your app and spawn a map entity.
All you need to do is spawn a TiledMap component with the map asset you want to load (e.g., your map.tmx file).
Make sure this map asset, along with any required dependencies (such as images or tilesets), is present in your local assets folder (by default, ./assets/).
use bevy::prelude::*;
use bevy_ecs_tiled::prelude::*;

fn main() {
    App::new()
        // Add Bevy's default plugins
        .add_plugins(DefaultPlugins)
        // Add the bevy_ecs_tiled plugin
        // bevy_ecs_tilemap::TilemapPlugin will be added automatically if needed
        .add_plugins(TiledPlugin::default())
        // Add your startup system and run the app
        .add_systems(Startup, startup)
        .run();
}

fn startup(
    mut commands: Commands,
    asset_server: Res<AssetServer>,
) {
    // Spawn a 2D camera
    commands.spawn(Camera2d);

    // Load a map asset and retrieve its handle
    let map_handle: Handle<TiledMapAsset> = asset_server.load("map.tmx");

    // Spawn a new entity with the TiledMap component
    commands.spawn(TiledMap(map_handle));
}
This simple example will load a map using the default settings.
Customizing Map Loading
You can customize how the map is loaded by listening to specific TiledEvent or adding various components to the map entity, such as:
TilemapAnchor— Controls the anchor point of the tilemap.TiledMapLayerZOffset— Adjusts the Z offset between map layers.TiledMapImageRepeatMargin— Control the margin for repeated images.TilemapRenderSettings— Configures rendering options.Transform— Sets the position, rotation, and scale of the map.Visibility— Controls the visibility of the map entity.
#![allow(unused)]
fn main() {
use bevy::prelude::*;
use bevy_ecs_tiled::prelude::*;

fn spawn_map(
    mut commands: Commands,
    asset_server: Res<AssetServer>,
) {
    commands
        // Load a map and set its anchor point to the
        // center instead of the default bottom-left
        .spawn((
            TiledMap(asset_server.load("map.tmx")),
            TilemapAnchor::Center,
        ))
        // Add an "in-line" observer to detect when
        // the map has finished loading
        .observe(
            |map_created: On<TiledEvent<MapCreated>>,
             assets: Res<Assets<TiledMapAsset>>,
             query: Query<(&Name, &TiledMapStorage), With<TiledMap>>| {
                // We can access the map components via a regular query
                let Ok((name, storage)) = query.get(map_created.event().origin) else {
                    return;
                };
                info!("=> Observer TiledMapCreated was triggered for map '{name}'");

                // Or directly the underneath raw tiled::Map data
                let Some(map) = map_created.event().get_map(&assets) else {
                    return;
                };
                info!("Loaded map: {:?}", map);

                // Additionally, we can access Tiled items using the TiledMapStorage
                // component: we can retrieve Tiled items entity and access
                // their own components with another query (not shown here).
                // This can be useful if you want for instance to create a resource
                // based upon tiles or objects data but make it available only when
                // the map is actually spawned.
                for (id, entity) in storage.objects() {
                    info!(
                        "(map) Object ID {:?} was spawned as entity {:?}",
                        id, entity
                    );
                }
            }
        );
}
}
More Examples
For more advanced use cases, such as loading worlds, chunking, custom properties, or integrating with physics, see the examples directory in the repository and notably the demo_platformer.
You can also refer to the API documentation for details on all available components and configuration options.
Spawn / Despawn / Reload a Map
These aspects are also covered in the dedicated example.
Spawning a Map
Spawning a map is a two-step process:
- Load the map asset using Bevy's
AssetServer. - Spawn a
TiledMapcontaining a reference to this map asset.
#![allow(unused)]
fn main() {
fn spawn_map(
    mut commands: Commands,
    asset_server: Res<AssetServer>
) {
    // Load the map asset
    let map_handle: Handle<TiledMapAsset> = asset_server.load("map.tmx");

    // Spawn the map entity with default settings
    commands.spawn(TiledMap(map_handle));
}
}
Tip:
You can load maps at startup or at any time during your game.
There is no restriction on the number of maps loaded or spawned simultaneously.
Despawning a Map
To despawn a map, simply remove its top-level entity.
All child entities (layers, tiles, objects, etc.) will be automatically despawned.
#![allow(unused)]
fn main() {
pub fn despawn_map(
    mut commands: Commands,
    map_query: Query<Entity, With<TiledMap>>,
) {
    // Iterate over all map entities
    for map in map_query.iter() {
        // Despawn the map entity and all its children
        commands.entity(map).despawn();
    }
}
}
Respawning / Reloading a Map
If you want to reload or respawn a map, you can despawn it and spawn it again as shown above.
However, there is a more ergonomic way: insert the RespawnTiledMap component on the map entity.
#![allow(unused)]
fn main() {
fn respawn_map(
    mut commands: Commands,
    map_query: Query<Entity, With<TiledMap>>,
) {
    if let Ok(entity) = map_query.single() {
        commands.entity(entity).insert(RespawnTiledMap);
    }
}
}
This will reload the same map asset, despawning and respawning all child entities (layers, tiles, objects, etc.), while preserving the top-level map entity and its components.
- Any changes you made to child entities (e.g., tile color, object position) will be reset to their original state.
- Components on the map entity itself (such as
TilemapRenderSettings,TiledMapLayerZOffset, orTransform) will be preserved.
This is useful for implementing level respawn or resetting a map to its initial state.
Loading a New Map Over an Existing One
To replace the current map with a different one, simply insert a new TiledMap on the existing map entity:
#![allow(unused)]
fn main() {
fn handle_reload(
    mut commands: Commands,
    asset_server: Res<AssetServer>,
    map_query: Query<Entity, With<TiledMap>>,
) {
    if let Ok(entity) = map_query.single() {
        commands.entity(entity)
            .insert(
                TiledMap(asset_server.load("other_map.tmx"))
            );
    }
}
}
- If you insert the same map handle, it is equivalent to inserting the
RespawnTiledMapcomponent.
Summary
- Spawn: Load the map asset and spawn a
TiledMap. - Despawn: Remove the map entity (children are cleaned up automatically).
- Respawn/Reload: Insert
RespawnTiledMapor a newTiledMapto reload or swap maps efficiently.
For more advanced usage, see the examples.
Add Physics Colliders
Tiled allows you to add objects to your map—either directly on an object layer or attached to a tile.
bevy_ecs_tiled can use these objects to automatically spawn physics colliders when loading the map.
Two physics engines are supported out of the box:
Both are well-integrated and offer similar features in the context of bevy_ecs_tiled. You can use them as-is, customize their behavior, or implement your own backend.
Creating Collider Objects in Tiled
To spawn colliders, you need to define objects in your map:
- Objects on an object layer:
These are the standard objects you place in Tiled on an object layer. - Objects attached to a tile:
Edit your tileset and use Tiled's built-in collision editor to define collision shapes for tiles.
Both types of objects are supported and will result in physics colliders being spawned in your game, based on their shapes.
Automatically Spawning Colliders
To automatically spawn colliders from Tiled objects, you need to:
- Enable the appropriate feature in your
Cargo.toml:
Eitheravianorrapier, depending on your backend choice.
You can also enable only thephysicsfeature and provide your own backend (see below).
Example: Using the Avian backend
[dependencies]
bevy = "0.16"
bevy_ecs_tiled = { version = "0.10", features = ["avian"] }
Note:
You may need to adjustbevyandbevy_ecs_tiledversions.
- Add the
TiledPhysicsPlugin<T>
with theTiledPhysicsBackendof your choice.
Example: Using the Avian backend
use bevy::prelude::*;
use avian2d::prelude::*;
use bevy_ecs_tiled::prelude::*;

// You must enable the 'avian' feature for bevy_ecs_tiled

fn main() {
    App::new()
        // Load bevy_ecs_tiled main plugin
        .add_plugins(TiledPlugin::default())
        // Load bevy_ecs_tiled physics plugin (select Avian backend)
        .add_plugins(TiledPhysicsPlugin::<TiledPhysicsAvianBackend>::default())
        // Load Avian main plugin
        .add_plugins(PhysicsPlugins::default().with_length_unit(100.0))
        // Add your systems and run the app!
        .add_systems(Startup, startup)
        .run();
}

fn startup(mut commands: Commands, asset_server: Res<AssetServer>) {
    commands.spawn(Camera2d);
    commands.spawn(TiledMap(asset_server.load("map.tmx")));
}
Colliders will be spawned for every object or tiles colliders in your map automatically.
We provide two TiledPhysicsBackend that can be used out of the box:
TiledPhysicsAvianBackend: for the Avian 2D physics engineTiledPhysicsRapierBackend: for the Rapier 2D physics engine
Note:
You can actually use several physics backends at the same time if you register theTiledPhysicsPlugin<T>plugin multiple times, but with differentTiledPhysicsBackend.
Filtering Which Objects Get Colliders
By default, colliders are spawned for all objects (regular objects and tile colliders).
If you want more control, use the TiledPhysicsSettings component.
This component lets you filter which objects/layers should have colliders, based on their names.
Example: Only spawn colliders for certain objects/layers
#![allow(unused)]
fn main() {
use bevy::prelude::*;
use avian2d::prelude::*;
use bevy_ecs_tiled::prelude::*;

fn startup(mut commands: Commands, asset_server: Res<AssetServer>) {
    commands.spawn(Camera2d);
    commands.spawn((
        TiledMap(asset_server.load("finite.tmx")),
        // Restrict colliders to:
        // - objects named 'hitbox' or 'collision'
        // - tile colliders in a layer named 'collision'
        TiledPhysicsSettings::<TiledPhysicsAvianBackend> {
            objects_filter: TiledFilter::Names(vec!["hitbox".into(), "collision".into()]),
            tiles_layer_filter: TiledFilter::Names(vec!["collision".into()]),
            ..default()
        },
    ));
}
}
Colliders Aggregation
Tiled uses simple shapes (rectangles, ellipses, polygons) to define colliders.
To reduce the number of physics colliders and improve performance, bevy_ecs_tiled tries to merge these simple shape colliders into a single complex one whenever possible.
- Tiles: Merging is actually performed at the tilemap level.
Eventhough you can use several shapes to define a tile's collider, these shape will be merged into a single collider and all tile colliders for a given tilemap will also be merged together.
The collider entity is spawned at the tilemap level. - Regular objects: If an object references a tile, it will inherit that tile's collider and if the tile has several shapes, they will be merged.
The collider entity is spawned at the object level and each object always gets its own collider.
Note:
BothTiledPhysicsAvianBackendandTiledPhysicsRapierBackendprovide several strategies to aggregate colliders. You can see their respective documentation for more information.
Custom Physics Backends
For advanced use cases, you can implement your own physics backend.
Just create a struct that implements the TiledPhysicsBackend trait (i.e., provide a spawn_colliders function), and use it when registering the TiledPhysicsPlugin<T> plugin.
See this example for more information.
Physics Events
When a collider entity is spawned, a TiledEvent<ColliderCreated> event is sent.
It contains information about the origin of the collider.
This can be useful to add custom components to your colliders.
For instance, with Avian:
#![allow(unused)]
fn main() {
use bevy::prelude::*;
use avian2d::prelude::*;
use bevy_ecs_tiled::prelude::*;

fn startup(mut commands: Commands, asset_server: Res<AssetServer>) {
    commands.spawn(Camera2d);
    commands
        .spawn(TiledMap(asset_server.load("map.tmx")))
        .observe(|collider_created: On<TiledEvent<ColliderCreated>>, mut commands: Commands| {
            // Filter collider created from Tiled objects
            if collider_created.event().event.source == TiledCollider::Object {
                // Add a RigidBody::Static to the collider entity
                commands
                    .entity(collider_created.event().origin)
                    .insert(RigidBody::Static);
            }
        });
}
}
Using Tiled Custom Properties
Tiled allows you to add "custom properties" to various items such as layers, tiles, objects, or maps.
These custom properties can be:
- Standard types: string, integer, float, color, etc.
- Custom types: your own structures with sub-properties (which can themselves be standard or custom types)
With bevy_ecs_tiled, you can load these custom properties into your game and access them as regular Bevy Component or Resource.
This means you can define game logic directly in the Tiled editor and use it seamlessly in your Bevy game.
For example, you could:
- Associate a "movement cost" with a tile type
- Create an object representing your player or an enemy
- Add a generic "trigger zone" (e.g., damaging zone, victory zone)
- ...or anything else your game needs!
Overview
The user properties mechanism relies on Bevy's reflection system.
To use custom properties from Tiled in your game, you need to:
- Enable the
user_propertiesfeature in your localCargo.tomlfile. - Declare your custom types in Rust and make them reflectable.
- Run your game once to export these types as a
.jsonfile, readable by Tiled. - Import this
.jsonfile into the Tiled editor to make your types available as custom properties.
Once this is done, you can use your types directly in Tiled. When you load your map, the corresponding Component or Resource will be automatically inserted into your Bevy world.
For a quick demonstration, see the dedicated example.
Enabling the feature
Update your local Cargo.toml file to enable the user_properties feature:
[dependencies]
bevy = "0.16"
bevy_ecs_tiled = { version = "0.10", features = ["user_properties"] }
Note:
You may need to adjustbevyandbevy_ecs_tiledversions.
Declaring Types for Custom Properties
Each Tiled map, layer, tile, or object is represented by a Bevy Entity.
If you want to add custom properties to them, these properties should be a Component.
To make your custom types usable in Tiled, they must be "reflectable":
- Derive the
Reflecttrait for your type. - Register your type with Bevy.
Example:
use bevy::prelude::*;

// Declare a component and make it reflectable
#[derive(Component, Reflect, Default)]
#[reflect(Component, Default)]
struct Biome {
    block_line_of_sight: bool,
    ty: BiomeType,
}

// Any sub-type must also be reflectable, but does not need to be a Component
#[derive(Default, Reflect)]
#[reflect(Default)]
enum BiomeType {
    #[default]
    Unknown,
    Forest,
    Plain,
    Mountain,
    Desert,
}

// Register your top-level struct in the Bevy registry
fn main() {
    App::new()
        .register_type::<Biome>();
}
Tip:
Deriving Default is useful: you don't have to fill all fields in Tiled; missing fields will use the type's default value.
Importing Custom Properties into Tiled
Before you can add custom properties in Tiled, you need to export them from your app and import them into Tiled.
When running with the user_properties feature, your app will automatically produce a .json export of all types registered with Bevy.
By default, this file is named tiled_types_export.json and is created in your workspace root.
You can change the filename or disable export via TiledPluginConfig.
To import this file in Tiled:
- In Tiled, go to View → Custom Types Editor

- Click the Import button and select your
.jsonfile

- You will now see all custom types imported from your application

Adding Custom Properties in Tiled
Once imported, you can add custom properties to your map:
- Select the element (map, layer, object, etc.) you want to add a property to.
- In the "Custom Properties" panel, right-click and select Add Property
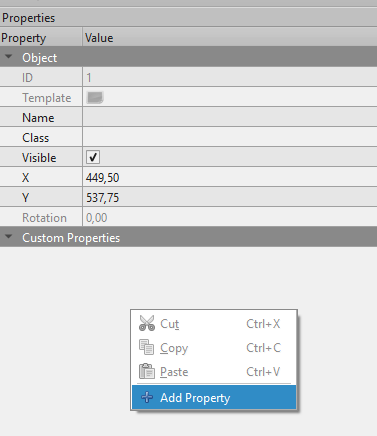
- Choose the type you want to add and give it a name.
- For example, add the
BiomeInfostype from the earlier example:
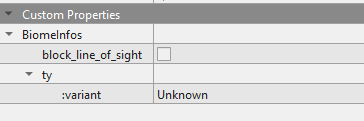
- Set the values as needed for this element.
When you load the map, the corresponding Bevy entity will have the appropriate Component with the values you set.
Note:
Only add properties imported from Bevy. Properties created only in Tiled (ie. not exported from your app) will not be loaded in Bevy. You can also control which properties are exported from your application viaTiledPluginConfig
Custom Properties Usage with Bevy
When loading a Tiled map with custom properties, a common pattern is to use Bevy On<Add> observers to react to the spawn of a particular Tiled element.
When the On<Add> observer is triggered, you can then insert additional components or spawn another entity.
#![allow(unused)]
fn main() {
use bevy::prelude::*;
use bevy_ecs_tiled::prelude::*;

// Declare a marker component: assume it will be added to a particular Tiled object
#[derive(Component, Default, Debug, Reflect)]
#[reflect(Component, Default)]
struct PlayerSpawn;

fn startup(mut commands: Commands, asset_server: Res<AssetServer>) {
    commands.spawn(Camera2d);
    commands
      .spawn(TiledMap(asset_server.load("map.tmx")))
      // We will run this observer for every Tiled object with the `PlayerSpawn` component
      .observe(|add_player_spawn: On<Add, PlayerSpawn>, mut commands: Commands| {
         // Retrieve the Tiled object entity
         let player_spawn_entity = add_player_spawn.event().entity;
         // Add extra components
         commands
            .entity(player_spawn_entity)
            .insert((
               ...
            ));
      });
}
}
You can also have a look to the dedicated example.
Special Considerations
- You can add custom properties to objects, layers, or the map itself.
To add properties to tiles, edit the tileset directly.
We currently do not support adding properties to the tileset itself. - For more on adding custom properties, see the official Tiled documentation.
- You can also add
Resources to your map.
Since resources are global and not attached to a specific entity, they are only supported as map-level properties.
If you add a resource to another Tiled element, it will be ignored.
Debug your project
Logging
Bevy uses the tracing crate for logging, which is very powerful for debugging and profiling.
You can find more information in the official documentation.
To get detailed information about what's happening in your app, set the RUST_LOG environment variable to trace:
RUST_LOG=trace cargo run
This will show all logs at the trace level, but it can be very verbose.
To filter logs and only display information from bevy_ecs_tiled, use:
RUST_LOG=bevy_ecs_tiled=trace cargo run
This will only display logs from the bevy_ecs_tiled crate at the trace level.
bevy_ecs_tiled Debug Plugins
When the debug feature is enabled, bevy_ecs_tiled provides several debug plugins to help visualize and inspect your maps.
You can enable all debug plugins at once by adding the TiledDebugPluginGroup to your app:
use bevy::prelude::*;
use bevy_ecs_tiled::prelude::*;

fn main() {
    App::new()
        .add_plugins(TiledDebugPluginGroup)
        .run();
}
Or add them individually as needed:
TiledDebugObjectsPlugin: Displays anarrow_2dand a polyline outlineGizmosat each Tiled object's position and shape.TiledDebugTilesPlugin: Shows thebevy_ecs_tilemaptile index (TilePos) above each tile.TiledDebugWorldChunkPlugin: Draws aGizmosrectangle for each map boundary and world render chunk.TiledDebugAxisPlugin: Displays aGizmosaxes marker at the world origin.
For more details, see the API reference.
Third-Party Debugging Tools
bevy-inspector-egui
This plugin is highly recommended for debugging and inspecting your game world.
Add the dependency to your Cargo.toml:
[dependencies]
bevy-inspector-egui = "0.30"
Then add the WorldInspectorPlugin to your application:
use bevy::prelude::*;
use bevy_inspector_egui::quick::WorldInspectorPlugin;

fn main() {
    App::new()
        .add_plugins(DefaultPlugins)
        .add_plugins(EguiPlugin { enable_multipass_for_primary_context: true })
        .add_plugins(WorldInspectorPlugin::new())
        .run();
}
Now, you can browse and edit components from all entities spawned in your game in real time.
More information is available on the project's GitHub page.
Physics Plugins
Both Avian and Rapier provide their own debug visualization plugins, which are invaluable when working with colliders and physics.
Avian Physics Debugging:
use bevy::prelude::*;
use avian2d::prelude::*;

fn main() {
    App::new()
        // Add Avian regular plugin
        .add_plugins(PhysicsPlugins::default().with_length_unit(100.0))
        // Add Avian debug plugin
        .add_plugins(PhysicsDebugPlugin::default())
        .run();
}
Rapier Physics Debugging:
use bevy::prelude::*;
use bevy_rapier2d::prelude::*;

fn main() {
    App::new()
        // Add Rapier regular plugin
        .add_plugins(RapierPhysicsPlugin::<NoUserData>::pixels_per_meter(100.0))
        // Add Rapier debug plugin
        .add_plugins(RapierDebugRenderPlugin::default())
        .run();
}
Note:
For Rapier, you must enable either thedebug-render-2dfeature on thebevy_rapier2dcrate or therapier_debugfeature onbevy_ecs_tiled.
Migration to bevy_ecs_tiled v0.12
This guide outlines the steps required to migrate your project to version 0.12 of bevy_ecs_tiled.
Main Changes
TiledAnimationAPI redesign for non-consecutive frame support- Physics colliders spawning rework with simplified geometry control
- Support for Text Objects and Group Layer
Migration Steps
1. Update Dependencies
Update your Cargo.toml to use version 0.12 and compatible physics backends:
bevy = "0.18"
bevy_ecs_tiled = "0.12"
avian2d = "0.6"      # if using Avian physics
bevy_rapier2d = "0.34" # if using Rapier physics
2. Update TiledAnimation Usage
The animation API has been completely redesigned to support non-consecutive frame IDs and per-frame durations:
Before (v0.11):
#![allow(unused)]
fn main() {
pub struct TiledAnimation {
    pub start: usize,
    pub end: usize,
    pub frame_duration: f32,
}
}
After (v0.12):
#![allow(unused)]
fn main() {
pub struct TiledAnimation {
    pub frames: Vec<(usize, f32)>, // (atlas_index, duration_in_seconds)
    pub current_frame: usize,
}
}
Impact: Update any code that creates or manipulates TiledAnimation components to use the new frames vector format. Each tuple contains the atlas frame index and its duration in seconds.
Important: Tile-layer animations via
bevy_ecs_tilemap::AnimatedTilestill require consecutive IDs and uniform durations. Violations will now emit warnings instead of silently dropping frames.
3. Update Physics Colliders Spawning
Physics collider handling has been significantly reworked. This change should allow to better handle most physics use cases (for instance #169)
Key Changes:
- One event per object: Only a single
ColliderCreatedevent is sent per physics object, not per collider - Backend control: Physics backends now decide the ECS hierarchy structure (colliders may be directly attached to the physics object rather than as child entities)
- Geometry simplification control: Two new options for controlling collider aggregation:
- Global setting:
TiledPhysicsSettings::<T>::simplify_geometry - Per-item override:
TiledPhysicsDisableGeometrySimplificationcomponent
- Global setting:
Update your physics event handlers:
#![allow(unused)]
fn main() {
// Old: Could receive multiple ColliderCreated events per object
fn on_collider_created(mut events: EventReader<ColliderCreated>) {
    for event in events.read() {
        // Handle each collider individually
    }
}

// New: Single event per object, check the collider structure in physics backend
fn on_collider_created(mut events: EventReader<ColliderCreated>) {
    for event in events.read() {
        // Event now provides direct reference to parent entity
        let parent = event.parent_entity;
    }
}
}
Disable geometry simplification per-object when needed:
#![allow(unused)]
fn main() {
// Prevent merging colliders for a specific object
commands.entity(object_entity)
    .insert(TiledPhysicsDisableGeometrySimplification);
}
4. Support for Text Objects and Group Layers (Optional)
Version 0.12 adds support for text objects and group layers:
- Text objects: Tiled text objects are now spawned with
TiledObjectTextandTiledObjectTextBoxcomponents - Group layers: Hierarchical layer organization is now fully supported. Use
get_layer_from_map()andget_object_from_map()helpers which now traverse group layers
No migration action required unless you're explicitly working with these features.
Resources
Migration to bevy_ecs_tiled v0.11
This guide outlines the steps required to migrate your project to version 0.11 of bevy_ecs_tiled.
Main Changes
- Bevy v0.18 Support:
bevy_ecs_tilednow works seamlessly with Bevy v0.18, allowing you to take advantage of the latest engine features and performance improvements. See the Bevy 0.18 release notes for details.
Migration Steps
-
Update Dependencies in
Cargo.toml:bevy = "0.18" bevy_ecs_tiled = "0.11"Note: You may also need to update other Bevy-related crates to ensure compatibility.
-
Review the Bevy Migration Guide: Follow Bevy's official migration steps to update your project for Bevy v0.18. This will help you resolve breaking changes and take advantage of new features.
Resources
Migration to bevy_ecs_tiled v0.10
This guide outlines the steps required to migrate your project to version 0.10 of bevy_ecs_tiled.
Main Changes
-
Bevy v0.17 Support:
bevy_ecs_tilednow works seamlessly with Bevy v0.17, allowing you to take advantage of the latest engine features and performance improvements. See the Bevy 0.17 release notes for details. -
Enhanced ColliderCreated Event: The
ColliderCreatedevent now includes a direct reference to the collider's parent entity, making it easier to attach additional physics components or interact with spawned colliders. The event previously only contained aTiledColliderOrigin, which has been renamed toTiledColliderSource. -
External Type Re-exports: Types from external crates (such as
rs-tiled,geo, andregex) are now re-exported through dedicated modules. This avoids name clashes and makes type usage explicit.
Migration Steps
-
Update Dependencies in
Cargo.toml:bevy = "0.17" bevy_ecs_tiled = "0.10"Note: You may also need to update other Bevy-related crates to ensure compatibility.
-
Review the Bevy Migration Guide: Follow Bevy's official migration steps to update your project for Bevy v0.17. This will help you resolve breaking changes and take advantage of new features.
-
Update Usage of External Types:
If your code uses types from
rs-tiled,geo, orregex, you must now reference them via their dedicated modules. This ensures clarity and prevents naming conflicts.#![allow(unused)] fn main() { use bevy_ecs_tiled::prelude::*; // For external types, use their module: let tiled_id: tiled::TiledId = 10; } -
Update Usage of
TiledEvent<ColliderCreated>:In previous versions, the event only provided a
TiledColliderOrigin. In v0.10, this has been renamed toTiledColliderSource, and the event now also includes a reference to the collider's parent entity. This change makes it easier to interact with colliders and attach additional physics components directly after creation.
Resources
Migration to bevy_ecs_tiled v0.9
This guide outlines the steps required to migrate your project to version 0.9 of bevy_ecs_tiled.
Main Changes
- Improved Isometric Map Support:
Isometric maps are now much better supported, including correct physics collider shapes and placement. - Accurate Physics Colliders for Isometric Maps:
Physics colliders are now generated with the correct geometry and position for isometric maps. - Clear Distinction Between
grid_sizeandtile_size:
Previously,tile_size(the actual size of a tile) andgrid_size(the space a tile occupies on the grid) were treated as equivalent. This is not always true, especially for isometric maps. The API now enforces a clear distinction. - API Renaming for Clarity:
Several functions and methods have been renamed to improve clarity and expressiveness.
Migration steps
-
Update the dependency in
Cargo.toml:bevy_ecs_tiled = "0.9" -
Adjust function usage:
-
Removed:
tile_size_from_grid_size()has been removed.
Reason: Avoids confusion betweentile_sizeandgrid_size.tile_size_from_map()has been removed.
Reason: You should useTiledMapAsset::largest_tile_sizeinstead. -
Added:
A newtile_size()helper function is available to retrieve thetile_sizefrom aTile. -
Changed:
TiledMapAsset::world_space_from_tiled_position()is now private to the crate.
Reason: This is a low-level function and should not be used directly.TiledMapAsset::object_world_position()→ Renamed toTiledMapAsset::object_relative_position()
Signature remains the same.TiledMapAsset::tile_world_position()→ Renamed toTiledMapAsset::tile_relative_position()
Now takes an extraTilemapTileSizeargument instead of relying on the map'sTilemapGridSize.
-
Updated Geometry Methods:
The following methods onTiledObjectnow take 4 additional arguments to properly handle isometric maps:center()vertices()line_string()polygon()
Resources
Migration to bevy_ecs_tiled v0.8
This guide outlines the steps required to migrate your project to version 0.8 of bevy_ecs_tiled.
Main Changes
- Improved
TiledEventAPI: Provides an unified way to handle events and access underlying Tiled data. - Attach shape information to
TiledObject: Direct access to Tiled objects shape information through ECS. - Reworked physics colliders spawning: Integrate with the
geocrate to define and aggregate colliders together. - Reworked name filter API: The filter API have been extended to use
regexand is now also used for selecting which types are exported as Tiled custom properties. - Simplify
TiledMapStorageusage: Add helpers functions to theTiledMapStoragecomponent so it's easier to work with. - Explicit
SystemSet: Allow precise systems ordering for user applications. - Rationalize naming: Several types or functions have been renamed to better reflect what they actually do.
- Source code re-organization: Several files have been moved around or renamed.
Migration Steps
-
Update the dependency in
Cargo.toml:bevy_ecs_tiled = "0.8" -
Adjust your types:
Some types have been renamed, without any functional change, or not much.
It should be safe to simply run a "search and replace" command, in the following order (make sure to match whole words):
Old name New name Functional changes ? TiledMapTiledMapAssetTiledWorldTiledWorldAssetTiledMapHandleTiledMapTiledWorldHandleTiledWorldTiledMapPluginTiledPluginTiledColliderSpawnInfosThis one was actually removed TiledMapMarkerTiledMapThis one was actually removed TiledWorldMarkerTiledWorldThis one was actually removed TiledMapLayerTiledLayerTiledLayernow holds the layer kindTiledMapTileLayerTiledLayerTiledLayernow holds the layer kindTiledMapObjectLayerTiledLayerTiledLayernow holds the layer kindTiledMapGroupLayerTiledLayerTiledLayernow holds the layer kindTiledMapImageLayerTiledLayerTiledLayernow holds the layer kindTiledMapTileLayerForTilesetTiledTilemapTiledMapTileTiledTileTiledMapObjectTiledObjectTiledMapImageTiledImage -
Adjust your functions:
Some functions have been renamed, without changing their behaviour, or not much.
It should be safe to simply run a "search and replace" command:
Old name New name get_map_typetilemap_type_from_mapget_grid_sizegrid_size_from_mapget_tile_sizetile_size_from_maptile_size_from_gridtile_size_from_grid_sizeThe following functions are now methods of the
TiledMapAssetstruct:for_each_tileworld_space_from_tiled_position(renamed fromfrom_tiled_position_to_world_space)
-
Adjust your imports:
Some modules or types have changed names or locations. If you import types using their defining path you may need to adjust.
An easy way to get past this is to import the whole prelude:
bevy_ecs_tiled::prelude::*or to use the type prelude path, such asbevy_ecs_tiled::prelude::TiledPlugin. -
Adjust
EventAPI usageThe event API has been reworked and now revolves around a generic
TiledEvent<E>structure. This provides more context for each event, including the origin of each particular eventEand helper methods to access Tiled data.See the dedicated guide on events for details.
-
Update custom physics backend
Most of the work that was done in the physics backend is now done by the crate itself which should simplify any custom physics backend implementation. As a result, the
spawn_collidersfunction from theTiledPhysicsBackendtrait have changed: you should refer to its documentation for more information. -
Update filter API usage
The filter API used to revolve around two enums:
TiledNamefor creating filters andTiledNameFilterfor matching them. It felt a bit cumbersome.
Now, everything is done via the newTiledFilterenum for doing both operations and we added support for regular expresions using theregexcrate.We also added a new parameter to
TiledPluginConfigto control which properties are exported from Bevy at startup. -
Adjust
TiledMapStoragecomponent usageFields in
TiledMapStorageare now private. You should use the provided methods instead of accessing fields directly.
Resources
From v0.6.X to v0.7.X
Overview
Version 0.7 updates the crate for Bevy v0.16 and take advantage of the new TilemapAnchor component from bevy_ecs_tilemap.
Bevy v0.16 update
TilemapAnchor
The TiledMapAnchor component have been deprecated in favor of the TilemapAnchor component from bevy_ecs_tilemap.
This new enum contains more variants, as you can see in the API reference.
Before :
#![allow(unused)]
fn main() {
    commands.spawn((
        TiledMapHandle(asset_server.load("map.tmx")),
        TiledMapAnchor::Center,
    ));
}
After :
#![allow(unused)]
fn main() {
    commands.spawn((
        TiledMapHandle(asset_server.load("map.tmx")),
        TilemapAnchor::Center,
    ));
}
From v0.5.X to v0.6.X
Overview
Version 0.6 brings new features such as Tiled world support and tiles colliders aggregation (which should improve performances when working with physics), bugfixes (mostly for infinite maps) and a rework of the API to make it more user-friendly.
For instance, we now use entity-scoped observers for our loading events instead of global ones, so it's easier to work with several maps at the same time.
Code base have also been re-organized to better fit the new world feature, but it should not impact end-users.
Plugin instanciation
You don't need to manually instanciate the TilemapPlugin from bevy_ecs_tilemap.
It is now automatically done when adding TiledMapPlugin to your application if not already done.
Before :
use bevy::prelude::*;
use bevy_ecs_tiled::prelude::*;
use bevy_ecs_tilemap::prelude::*;

fn main() {
    App::new()
        // Main plugin from bevy_ecs_tilemap
        .add_plugins(TilemapPlugin)
        // Main plugin from bevy_ecs_tiled
        .add_plugins(TiledMapPlugin::default());
}
After :
use bevy::prelude::*;
use bevy_ecs_tiled::prelude::*;

fn main() {
    App::new()
        // Main plugin from bevy_ecs_tiled:
        // implicitely load bevy_ecs_tilemap main plugin
        .add_plugins(TiledMapPlugin::default());
}
Map loading events
Map loading events have been heavily updated :
- Instead of using a single global observer, we now trigger an entity-scoped observer and send a regular event
- Only use "safe" methods to retrieve data from events (no more
unwrap()internally) - Store an
AssetId<TiledMap>instead of aHandle<TiledMap>to acces Tiled map data, enforce the fact that we store a weak reference in the event and not a strong one. - Some fields from the events have been renamed
Before :
use bevy::prelude::*;
use bevy_ecs_tiled::prelude::*;

fn main() {
    App::new()
        .add_plugins(TiledMapPlugin::default())
        .add_systems(Startup, startup)
        // Previously, we could only use a global observer
        .add_observer(|trigger: Trigger<TiledMapCreated>, map_asset: Res<Assets<TiledMap>>| {
            // Previously, the method to retrieve map data would panic in case of error
            let map = trigger.event().map(&map_asset);
            info!("(observer) Loaded map: {:?}", map);
        });
}

fn startup(
  mut commands: Commands,
  asset_server: Res<AssetServer>
) {
    commands.spawn(TiledMapHandle(asset_server.load("map.tmx")));
}
After :
use bevy::prelude::*;
use bevy_ecs_tiled::prelude::*;

fn main() {
    App::new()
        .add_plugins(TiledMapPlugin::default())
        .add_systems(Startup, startup)
        .add_systems(Update, read_map_events);
}

fn startup(mut commands: Commands, asset_server: Res<AssetServer>) {
    commands
        .spawn(TiledMapHandle(asset_server.load("map.tmx")))
        // Now, you can use an entity-scoped observer
        .observe(
            |trigger: Trigger<TiledMapCreated>, map_asset: Res<Assets<TiledMap>>| {
                // Now, this method return an Option<T> and don't panic in case of error
                if let Some(map) = trigger.event().get_map(&map_asset) {
                    info!("(observer) Loaded map: {:?}", map);
                }
            },
        );
}

// Or a regular event
fn read_map_events(mut map_events: EventReader<TiledMapCreated>, map_asset: Res<Assets<TiledMap>>) {
    for event in map_events.read() {
        if let Some(map) = event.get_map(&map_asset) {
            info!("(event) Loaded map: {:?}", map);
        }
    }
}
For more detailled informations, you should have a look to the dedicated example or the guide.
Physics
To get tile colliders aggregation working, we had to rework a bit the physics API :
- function
TiledPhysicsBackend::spawn_collider()can now spawn several colliders per call. To reflect that it now returns aVec<TiledColliderSpawnInfos>instead of anOption<TiledColliderSpawnInfos>. Also, it now takes aTiledNameFilteras input parameter to filter out unwanted objects - remove the
TiledColliderCreatedevents which added some complexity but did not have actual usage - rename
TiledColliderSourceTypetoTiledColliderand remove theTilevariant in favor of the newTilesLayer TiledPhysicsBackendnow requires to implement theClone,ReflectandDebugtraits- rename Rename
ObjectNameFiltertoTiledNameFiltersince we also use it for layer name
Schedules
To prevent potential Bevy error B0003 we changed a bit how our systems are scheduled.
Before, everything was done in the Update schedule.
Now, we schedule systems that spawn entities in the PreUpdate schedule and systems that could despawn entities in the PostUpdate schedule.
Misc API changes
- rename
TiledIdStoragecomponent toTiledMapStorageso we are consistent with the new world API - rename
ObjectNameFiltertype toTiledNameFiltersince we also use it for layer names - rename
from_tiled_coords_to_bevyfunction tofrom_tiled_position_to_world_space - split
TiledMapSettingscomponent in two:TiledMapAnchorandTiledMapLayerZOffset
From v0.4.X to v0.5.X
Overview
Version 0.5 updates the crate for Bevy v0.15.
It notably takes advantage of the new required_component feature to simplify the crate API.
Also, this version provide some fixes related to user properties. If you are using them, you should reload your export file.
Bevy v0.15 update
Misc changes
TiledMapSettings update
map_initial_transform and map_initial_visibility have been removed from TiledMapSettings.
If you want to tweak your map positioning or visibility, you should instead directly insert corresponding Transform or Visibility components on the map entity.
Before:
#![allow(unused)]
fn main() {
    let map_handle: Handle<TiledMap> = asset_server.load("map.tmx");
    commands.spawn((
        TiledMapHandle(map_handle),
        TiledMapSettings {
            map_initial_transform: Transform::from_xyz(150., 100., 0.),
            map_initial_visibility: Visibility::Hidden,
            ..Default::default()
        },
    ));
}
After:
#![allow(unused)]
fn main() {
    let map_handle: Handle<TiledMap> = asset_server.load("map.tmx");
    commands.spawn((
        TiledMapHandle(map_handle),
        Transform::from_xyz(150., 100., 0.),
        Visibility::Hidden,
    ));
}
From v0.3.X to v0.4.X
Overview
Version 0.4 was initially motivated by an update to the way we handle user properties but ended as a major overhaul of the plugin to provide a better API and to give more control to the user.
Plugin instanciation
The plugin now has an associated configuration, which you need to provide when you add it to your application.
The easiest way is to use the default configuration value :
use bevy::prelude::*;
use bevy_ecs_tiled::prelude::*;

fn main() {
    App::new()
        // You still need the bevy_ecs_tilemap plugin
        .add_plugins(TilemapPlugin)
        // And now, you have to provide a configuration for bevy_ecs_tiled plugin
        .add_plugins(TiledMapPlugin::default())
        .run();
}
The plugin configuration is described in the API reference
Tiled map spawn and configuration
The plugin entry point, ie. the TiledMapBundle bundle is gone.
It was cumbersome and did not allow for a proper separation of concerns (for instance, for physics).
Also, the Handle<TiledMap> type is not a Bevy component anymore.
It was done in order to anticipate expected changes in Bevy where Handle<T> won't be able to derive the Component trait anymore.
Anyway, the new way to spawn a map is now easier: you just have to spawn a TiledMapHandle referencing your .TMX file asset:
#![allow(unused)]
fn main() {
use bevy::prelude::*;
use bevy_ecs_tiled::prelude::*;

fn startup(mut commands: Commands, asset_server: Res<AssetServer>) {
    // Load the map: ensure any tile / tileset paths are relative to assets/ folder
    let map_handle: Handle<TiledMap> = asset_server.load("map.tmx");

    // Spawn the map with default options
    commands.spawn(TiledMapHandle(map_handle));
}
}
You can customize various settings about how to load the map by inserting the TiledMapSettings component on the map entity.
Tiled user properties
Before this change, you had to define your custom types both in Tiled and in your rust code. It was not user-friendly and error-prone.
Now, we take advantage of bevy_reflect to generate a file containing all the types known to Bevy.
This file can be imported in Tiled so you can use these types directly in the editor.
Migrating from the old implementation should be straight-forward.
First, you need need to update your custom types so they actually implement the Reflect trait :
- remove
#[derive(TiledObject)],#[derive(TiledCustomTile)],#[derive(TiledClass)]and#[derive(TiledEnum)]derived traits. Make sure to also remove associated attributes. - add
#[derive(Reflect)]derive trait on the types you want to use in Tiled. - make sure your components have the
#[reflect(Component)]attribute
Then, in your main / in your plugin setup, you then need to register your types with Bevy :
- replace calls to
register_tiled_object::<T>()with calls toregister_type::<T>(). - replace calls to
register_tiled_custom_tile::<T>()with calls toregister_type::<T>().
The final step is to actually generate the types import file (run your game once) and import the types to Tiled. Note that you may have to update your map / your tilesets to use the new types you just imported.
A dedicated guide about how to setup user properties is available in this book.
Tiled physics
Eventhough functionnalities around physics did not change much, the internals have been completely reworked and the API was updated a bit.
Notably, now you need to instanciate another plugin and specify which physics backend you want to use. The physics section of the book should get you through.
Map events
This is a new feature of this version which gives more control to the user over what he wants to do with a Tiled map. More information in the dedicated section
Misc changes
enum MapPositioning
Both enum name and fields name have been updated to better reflect what they actually do.
You should now use the new LayerPositioning enum.
fn from_isometric_coords_to_bevy()
Parameters tiled_position: Vec2 and iso_coords: IsoCoordSystem have been swapped for better consistency with other utility functions.
Useful links
Here is an unordered list of useful resources that may help when working on a 2D tile-base game.
Feel free to suggest any other link!
Notable crates
bevy: the Bevy enginebevy_ecs_tilemap: the crate we use for rendering our tilesrs-tiled: official Tiled rust bindingsbevy_ecs_ldtk: an equivalent ofbevy_ecs_tiledbut for the LDTK map editorhexx: an hexagonal tools lib for stuff like path-finding or hex coordinates manipulationbevy_mod_picking: a flexible set of plugins that add picking functionality to your bevy appbevy_picking_tilemap: provides abevy_mod_pickingbackend to add integration withbevy_ecs_tilemap, enabling individual Tile entities to receive the picking eventsavian: Avian physic backendbevy_rapier: Rapier physic backendbevy_northstar: A 2D/3D pathfinding crate, with a concrete usage example withbevy_ecs_tiled
Notable resources
- Bevy official website: lots of examples and learning materials
- Bevy API reference
- Unofficial Bevy Cheat Book: one the best resource to learn Bevy
- Tiled official website: to get the latest Tiled version and read associated documentation
- Red Blob Games: collections of tutorials on various gamedev topics, especially the hexagonal grids reference
- Some maths regarding isometric tiles
Contributing
Thank you for your interest in contributing to bevy_ecs_tiled!
Whether you're fixing bugs, adding features, improving documentation, or helping other users, your contributions are greatly appreciated.
Where to Start
If you're unsure where to begin, check out the GitHub issues page.
You might find it helpful to look at issues:
If you feel you can tackle one of these, please feel free to submit a PR!
Other valuable ways to contribute include:
- Helping other users by responding to issues or reviewing PRs
- Reporting bugs or suggesting improvements by opening new issues
- Contributing to dependencies, such as
rs-tiled,bevy_ecs_tilemap, or other crates in the Bevy ecosystem (or Bevy itself!)
Contribution Guidelines
When submitting a pull request, please ensure that:
- CI passes:
Run./tools/ci_check.shlocally to check formatting, linting, and tests. - Documentation:
Add or update in-code documentation for any new features or changes. - Changelog:
Update theCHANGELOG.mdfile with a description of your fix or feature. - Examples:
If you add a new example:- Update
examples/README.mdwith a description of your example. - Add your example to the workspace
Cargo.toml(and specify any required features).
- Update
- Assets:
If you add a new map, updateassets/README.mdwith its characteristics. If you add a new asset, update the "Assets credits" section of the mainREADME.mdand ensure you have the right to use it.
If you're not sure about something, feel free to open a draft PR or ask questions in your issue or PR.
Thanks in advance for helping make bevy_ecs_tiled better!